JDM B16a Captiva Blue Del Sol SiR - Carbon & More Airbrushing :)

Con

RMS Regular
OP
Con
Messages
5,712
Location
Northern Ireland Again
Drives
JDM Honda Del So
As expected the pull off the breaker roof has something in the rain gutters which I missed when cleaning.
A few spots on the mould needed cleaned then repairing which not ideal but is fine for a test piece and I will vinyl wrap the part next time.

20220713_121014.jpg


20220713_124913.jpg

20220713_221030.jpg


Usual chemical release agent was added in 4 layers then 8 layers of the release wax.

Which brought us to the point of actual layup of the fabric this is where you can tweak your layup to be stiffer or more flex.
By how much depends on the stack an

The test part for top was
x1 210 gsm 2x2 twill

20220714_192220.jpg

2mm Soric foam core
This foam has small hexagonal chambers that fill up with resin during infusion and helps as a flow medium too, increases strength but also increases weight.

20220715_143045.jpg

x2 210 gsm 2x2 twill

20220715_153043.jpg

On top of the dry fabric had peel ply and the infusion mesh as a flow medium.
Since its quite a large part you want to create a minute space for the resin and air to flow.

1 inlet and 1 outlet will still have 1 side draw more vac than the other so a flow mesh creates better channels.

20220715_172428.jpg


I like to envelope bag the part for infusion to avail any chasing small leaks, (hearing is not what it used to be), this is more materials but higher success rate


1400cm x 900cm poly bag with bagging tape which is basically like Blu Tac

20220715_191350.jpg

20220715_193615.jpg


Pierce bag and add in 6mm tubes for resin lines, crossing your fingers you dont puncture the bag too much and rip the hole.

20220715_205803.jpg


Pull full vac and leave for a while to do a drop lest, then if all good start infusion.

20220716_002443.jpg

I used the Easy composite IN2 infusion resin with the Slow hardener since it's a big part can take about 40 mins to infuse a slower gel time for resin lets you get it completely infused before it starts to gel and stop flowing. You can clamp the lines to reduce time further aswell if needed.

20220716_220142.jpg

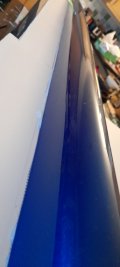
Infusion was success now to leave it to cure for 24 hours.
 

Con

RMS Regular
OP
Con
Messages
5,712
Location
Northern Ireland Again
Drives
JDM Honda Del So
So Popped the Roof top skin off the mould and as expected was some surface imperfections, but given that the mould will transfer exactly its ok for a test part.


20220717_121416.jpg


20220717_180327.jpg


Quick trim and the shape is bang on


Since I did not use a Gelcoat in mould coating before fabric like the China parts,
it is easy to sand down with 180 grit and lay a flow coat of epoxy to fill in any pin holes
20220718_235543.jpg


20220722_002104.jpg


Now the under side to do this month
 

da.murf

RMS Regular
Messages
10,360
Drives
Nissan 350z
So Popped the Roof top skin off the mould and as expected was some surface imperfections, but given that the mould will transfer exactly its ok for a test part.


View attachment 370260

View attachment 370261


Quick trim and the shape is bang on


Since I did not use a Gelcoat in mould coating before fabric like the China parts,
it is easy to sand down with 180 grit and lay a flow coat of epoxy to fill in any pin holes
View attachment 370262

View attachment 370263


Now the under side to do this month
That’s remarkable mate
 

Con

RMS Regular
OP
Con
Messages
5,712
Location
Northern Ireland Again
Drives
JDM Honda Del So
That’s remarkable mate
Cheers buddy I dread to think the amount of materials wasted in the learning process but really getting the hang of it now after 6 years.
Majority of time is spent doing projects for clients in US but more larger moulds now able to be done for my own car.
 

Con

RMS Regular
OP
Con
Messages
5,712
Location
Northern Ireland Again
Drives
JDM Honda Del So
Made a mould using the Rear Garnish that had the fillers smoothed in from a few years ago as a plug.

Done this one in a V Weave to match the roof.

Popping from the mould tomorrow
 

Con

RMS Regular
OP
Con
Messages
5,712
Location
Northern Ireland Again
Drives
JDM Honda Del So
Looks great.

Real random but have you kids over at Andrew’s comber lol? Feel I’ve seen you there lol?
Yes.
I am at Comber 3 times a day sometimes lifting some of my ones for work.

Grab me next time ya see me Black fleece+mohawk
 

Con

RMS Regular
OP
Con
Messages
5,712
Location
Northern Ireland Again
Drives
JDM Honda Del So
Picked up some Mugen style side skirts to make Carbon Versions which nobody has made before.
These are alot slimmer and more subtle than the Dealer optinal MS Design skirts

Original Mugen 2ns hand are $1500 for a pair and are like Hens Teeth if you can find some, they were PolyU where as these are new old stock unused fiberglass.


Providing the fitting is good then parts from the mould will be a direct replica and fit the same.

I already have the front bumper but not overly fussed as its too big and gash

s-l1600 (1).jpg


13a3baf8d84444ae36bddf8cdfe92b80.jpg


45537765.jpg
 

Con

RMS Regular
OP
Con
Messages
5,712
Location
Northern Ireland Again
Drives
JDM Honda Del So
Usual time consuming Mould making

Hot Glue some fluted sign board for flanges, then yellow filleting wax,


20230120_182846.jpg


20230120_145647.jpg


20230121_171831.jpg

Release agents being applied today then hopefully Gel Coat tonight with fiberglass backing materials.

All being well ready for layup of first Carbon part on Monday
 

Attachments

  • 20230120_182834.jpg
    20230120_182834.jpg
    90.6 KB · Views: 18

Con

RMS Regular
OP
Con
Messages
5,712
Location
Northern Ireland Again
Drives
JDM Honda Del So
2 Layers of Chemical Release
5 Layers of Release Wax
2 Layers of PVA Release agents

We are ready for the Black Gel Coat which is a Vinylester resin which is polishable

0.3mm thickness

20230121_225636[1].jpg
 

Con

RMS Regular
OP
Con
Messages
5,712
Location
Northern Ireland Again
Drives
JDM Honda Del So
Tooling Gel Coat, was 200g used cured over night.


20230122_013653.jpg


Fiberglass thin woven 193g for first coupling layer.

Using this thin woven layer first before the chopped strand fiberglass prevents "Print through" and prevents any texture on surface


20230122_123748.jpg


20230122_130814.jpg


Ready for Styrene Smelly Tooling Resin
 

Con

RMS Regular
OP
Con
Messages
5,712
Location
Northern Ireland Again
Drives
JDM Honda Del So
Some job mate! Interesting work. I like it👍🏻
Cheers Buddy its a slippery slope

2 layers of Chemical release agent then 6 layers of the release wax brings us to...

Thankfully a local supplier has big rolls of fabric delivered and sourced 3m x 1m in Belfast


First Lay of Carbon fabric into mould, this stage usually takes a good bit longer taking care to have no weave distortion on fabric.

180cm x 25cm used per layer

I am pretty sure I have the orientation going the correct way

Should be able to get 4 cuts per roll

4 Layers of this fabric is 1.2mm cured which should be fine for side skirts

Rotating + or - 90 degrees between layers is Quasi Isotropic diagonal rotation so will be strong enough and more importantly light

20230124_002634.jpg
 
Last edited:

Con

RMS Regular
OP
Con
Messages
5,712
Location
Northern Ireland Again
Drives
JDM Honda Del So
4 Layers of Carbon

1 Layer of Peel ply
1 Layer of Infusion mesh
2m Infusion Spiral
2x Bagging connectors
6mm PVC Hose and bagging tape leaves us with...


20230124_153106.jpg


20230124_124744.jpg


Pull Vac and leave for a drop test

Infusion took about 20 mins

20230124_154617.jpg


With a Wipercowl/Scuttle panel you can get away with 1 inlet and 1 out let.

Since you want the resin to flow the shortest possible route, and the resin will flow the direction of minimal resistance.

I should of done 2 inlets spaced out instead of 1 as the flow took longer on 1 side than the other.
20230124_170028.jpg

Ended up using 700g IN2 infusion resin with 30g hardener per 100g

This was a 50/50 mix of Fast/Slow Hardener

Will let it cure over night in garage at about 20 degrees and de-mould tomorrow lunch time
 

Con

RMS Regular
OP
Con
Messages
5,712
Location
Northern Ireland Again
Drives
JDM Honda Del So
Popped out handy enough

Original Fiberglass weight: 1.1kg

Full Carbon weight: 590g *Untrimmed or lacquered

This leaves about 500g weight saving per side skirt so in theory your saving 1kg

20230125_120545[1].jpg


20230125_120448[1].jpg


20230125_120051[1].jpg


Onto the next mould
 

EF Ian

RMS Regular
Messages
2,905
Location
Portrush
Drives
EF & 260Z GT-R
Nice work. I suppose every little helps when all added together. I would consider twinned 0.5kg savings to be worthwhile. (y)
 

Con

RMS Regular
OP
Con
Messages
5,712
Location
Northern Ireland Again
Drives
JDM Honda Del So
Nice work. I suppose every little helps when all added together. I would consider twinned 0.5kg savings to be worthwhile. (y)
Cheers my thinking is there are 14 panels that can be replaced.

Averaging about 65-70% weight saving per Carbon panel will add up
I have moulded the majority with just the Big ones like bonnet, boot, doors and bumpers left
 

EF Ian

RMS Regular
Messages
2,905
Location
Portrush
Drives
EF & 260Z GT-R
Will surely add up and combine to a useful weight saving.

I'm really keen to make a carbon roof for my EF, removing the sunroof and everything to do with it as well as switching from metal to carbon I am sure I can save over 20kg. Problem will be making a mould from a sunroof model while its still in place because I have so far failed to find a donor tintop roof.
 

Con

RMS Regular
OP
Con
Messages
5,712
Location
Northern Ireland Again
Drives
JDM Honda Del So
Will surely add up and combine to a useful weight saving.

I'm really keen to make a carbon roof for my EF, removing the sunroof and everything to do with it as well as switching from metal to carbon I am sure I can save over 20kg. Problem will be making a mould from a sunroof model while its still in place because I have so far failed to find a donor tintop roof.

Just remove it all and weld it up, then skim, then make a mould .
or
Make a mould with it in place and make do with the bump
 
Top